00 A review of how we got here
- Microservices
- Containers
- Building and exchanging images
- Inspecting and starting/stopping images
- Orchestration: [Service Managment, Scheduling, Resource Management]
- Working with real applications
Vagrant upmachines into a cluster- DC/OS GUI and CLI
- Installing a service on DC/OS
01 DC/OS - Theory 01 - Basic Concepts
Key terms to keep in mind:
DC/OS is a distributed OS for the data center built on top of Apache Mesos.
- DC/OS is made up of many components, most notably a distributed systems kernel (Mesos) and a container orchestration engine (Marathon).
- What’s not covered in the FOSS version: Enterprise versions include closed-source components and features like multitenancy, fine-grained permissions, secrets management, and end-to-end encryption.
Apache Mesos is a distributed systems kernel that manages cluster resources and tasks.
- Mesos is one of the core components of DC/OS that predates DC/OS itself, bringing maturity and stability to the platform.
DC/OS builds up on Mesos and uses a lot of similar terminology. It helps to consider the terms in the context of DC/OS as well as Mesos
Nodes
A DC/OS node is a virtual or physical machine on which a Mesos agent and/or Mesos master process runs. DC/OS nodes are networked together to form a DC/OS cluster.
Master Node
A DC/OS master node is a virtual or physical machine that runs a collection of DC/OS components that work together to manage the rest of the cluster.
- Each master node contains multiple DC/OS components, including most notably a Mesos master process.
- A Mesos master is a process that runs on master nodes to coordinate cluster resource management and facilitate orchestration of tasks.
- Master nodes work in a quorum to provide consistency of cluster coordination. To avoid split brain cluster partitioning, clusters must have an odd number of master nodes. For example, having three master nodes allows one to be down; having five master nodes allows two to be down, allowing for failure during a rolling update. Additional master nodes can be added for additional risk tolerance.
- The Mesos masters form a quorum and elect a leader.
- The lead Mesos master collects resources reported by Mesos agents and makes resource offers to Mesos schedulers. Schedulers then may accept resource offers and place tasks on their corresponding nodes.
- A cluster with only one master node is usable for development, but is not highly available and may not be able to recover from failure.
Agent Node
A DC/OS agent node is a virtual or physical machine on which Mesos tasks are run.
- Each agent node contains multiple DC/OS components, including most notably a Mesos agent process.
-
Agent nodes can be private or public, depending on agent and network configuration.
- A Mesos agent is a process that runs on agent nodes to manage the executors, tasks, and resources of that node.
- The Mesos agent registers some or all of the node’s resources, which allows the lead Mesos master to offer those resources to schedulers, which decide on which node to run tasks.
- The Mesos agent reports task status updates to the lead Mesos master, which in turn reports them to the appropriate scheduler.
Private Agent Node
A private agent node is an agent node that is on a network that does not allow entry or ‘ingress’ from outside of the cluster via the cluster’s infrastructure networking.
- The Mesos agent on each private agent node is, by default, configured with none of its resources allocated to any specific Mesos roles.
- Most service packages install by default on private agent nodes.
- Clusters are generally comprised of mostly private agent nodes.
Public Agent Node
A public agent node is an agent node that is on a network that does allow entry or ‘ingress’ from outside of the cluster via the cluster’s infrastructure networking.
- Public agent nodes are used primarily for externally facing reverse proxy load balancers, like Marathon-LB.
- Clusters generally have only a few public agent nodes, because a single load balancer can handle proxying multiple services.
Host Operating System
A host operating system is the operating system that runs on each DC/OS node underneath the DC/OS components, manages the local hardware and software resources, and provides common services for running other programs and services.
- DC/OS currently supports:
- While the host OS manges local tasks and machine resources, DC/OS manages cluster tasks and resources so that the user does not generally need to interact with the host operating systems on the nodes.
Bootstrap Machine
A bootstrap machine is the machine on which the DC/OS installer artifacts are configured, built, and distributed.
- The bootstrap machine is not technically considered part of the cluster since it does not have DC/OS installed on it (this may change in the future). For most installation methods, the bootstrap node must be accessible to and from the machines in the cluster via infrastructure networking.
- The bootstrap machine is sometimes used as a jumpbox to control SSH access into other nodes in the cluster for added security and logging. We’ll look at the alternative install later today
- If a bootstrap machine is not required for managing master node IP changes or as an SSH jumpbox, it can be shut down after bootstrapping and spun up on demand to add new nodes to the cluster.
Task
A Mesos task is an abstract unit of work, lifecycle managed by a Mesos executor, that runs on a DC/OS agent node.
- Tasks are often processes or threads, but could even just be inline code or items in a single-threaded queue, depending on how their executor is designed.
Executor
A Mesos executor is a method by which Mesos agents launch tasks.
- Executor processes are launched and managed by Mesos agents on the agent nodes.
- Mesos tasks are defined by their scheduler to be run by a specific executor (or the default executor).
- Each executor runs in its own container.
Scheduler
A Mesos scheduler is a program that defines new Mesos tasks and assigns resources to them (placing them on specific nodes).
- A scheduler receives resource offers describing CPU, RAM, etc., and allocates them for discrete tasks that can be launched by Mesos agents.
- A scheduler must register with Mesos as a framework.
Framework
A Mesos framework consists of a scheduler, tasks, and optionally custom executors.
- The term framework and scheduler are sometimes used interchangeably. Prefer the term scheduler.
Resource Offer
A Mesos resource offer provides a set of unallocated resources (e.g. cpu, disk, memory) from an agent to a scheduler so that the scheduler may allocate those resources to one or more tasks. Resource offers are constructed by the leading Mesos master, but the resources themselves are reported by the individual agents.
Ref: Application Framework development guide.
02 DC/OS - Theory 02 - Architecture and Components
A quick look at architecture
The DCOS Architecture can be divided into three layers:
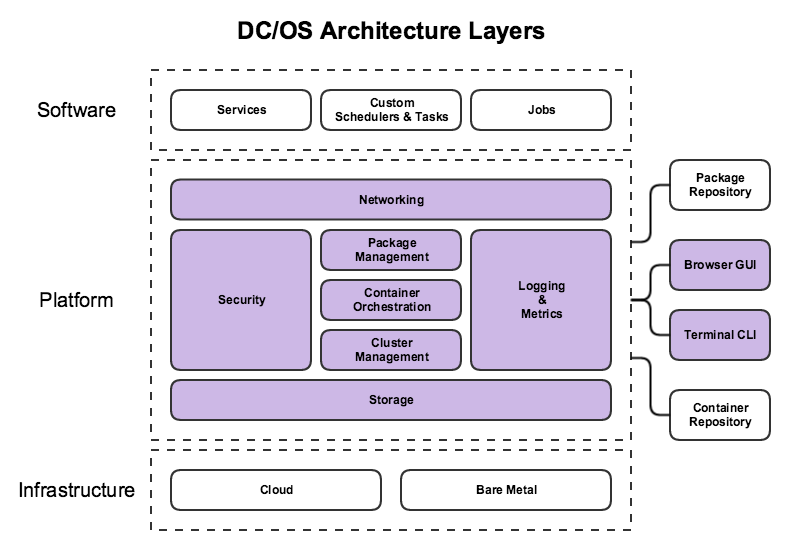
Software Layer
Package management and repository for multiple types of services: databases, message queues, stream processors, artifact repositories, monitoring solutions, continuous integration tools, source control management, log aggregators, etc.
Platform Layer
Takes care of the following using components (which we’ll talk about in a bit):
- Cluster Management
- Container Orchestration
- Container Runtimes
- Logging and Metrics
- Networking
- Package Management
- IAM and Security
- Storage
These components are divided across multiple node types:
- Master Nodes
- Private Agent Nodes
- Public Agent Nodes
Infrastructure Layer
At the infrastructure layer, DC/OS can be installed on public clouds, private clouds, or on-premises hardware. Some of these install targets have automated provisioning tools, but almost any infrastructure can be used, as long as it includes multiple x86 machines on a shared IPv4 network.
Additional Components
Also called external components, these include the CLI and GUI that let you interact with the cluster.
Components:
Most DC/OS components run as systemd services on the DC/OS nodes.
To see a list of the systemd components running on any node, list the contents of the /etc/systemd/system/dcos.target.wants/ directory or execute systemctl | grep dcos- to see their current status.
- SSH into a node, then:
systemctl | grep dcos-
This should list all the components on the particular node in your DCOS installation.
Here’s a bird’s eye view of the key components:
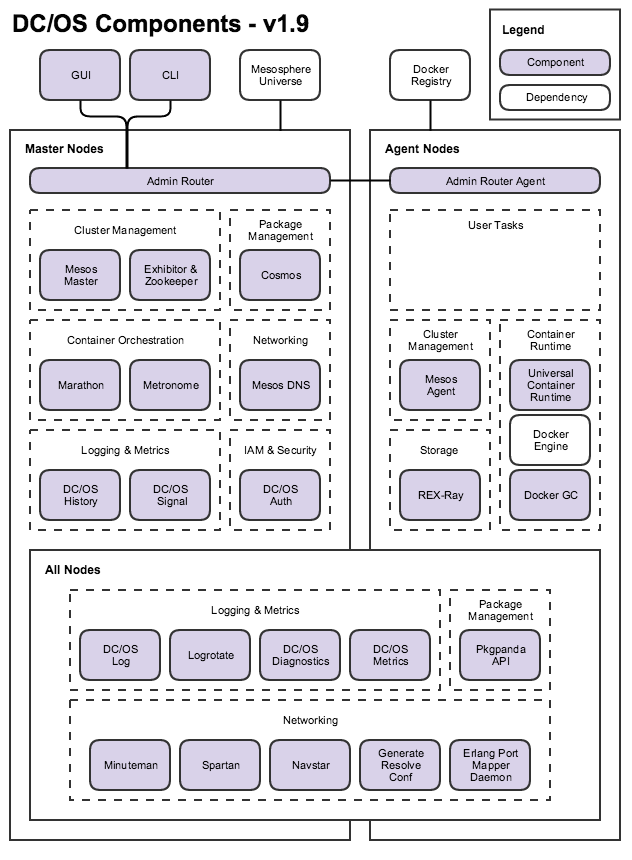
DC/OS components are installed, upgraded, and managed by DC/OS Component Package Manager (Pkgpanda - Package Panda - a package manager for systemd units).
Check out the packages directory of the DC/OS source repository, to see what gets installed when we vagrant up our cluster.
Let’s take a closer look at some of the components, we’ll be running a few in detail in the labs that follow:
Cluster Management vis Mesos Master, Exhibitor and Zookeeper
Mesos
manages resources and tasks as a distributed systems kernel. Mesos Master exposes scheduler, executor, and operator interfaces to facilitate cluster management. Mesos Agent manages individual executors, tasks, and resources on each DC/OS agent node. Mesos Agent Public is a Mesos Agent configured to run on DC/OS public agent nodes.
System Services:
dcos-mesos-master.servicedcos-mesos-slave.servicedcos-mesos-slave-public.service
Zookeeper
provides consistent, highly available, distributed key-value storage for configuration, synchronization, name registration, and cluster state storage.
Exhibitor
supervises Zookeeper and provides a management web interface.
System Service:
dcos-exhibitor.service
Container orchestration
The continuous, automated scheduling, coordination, and management of containerized processes and the resources they consume.
Marathon
orchestrates long-running containerized services (apps and pods).
System Service:
dcos-marathon.service
DC/OS Jobs or Metronome
orchestrates short-lived, scheduled or immediate, containerized jobs.
System Service:
dcos-metronome.service
Logging and Metrics
DC/OS Diagnostics (3DT)
aggregates and exposes component health. DC/OS Diagnostics is also known as DC/OS Distributed Diagnostics Tool (3DT).
Services:
dcos-3dt.socketdcos-3dt.service
DC/OS Log service exposes node, component, and container (task) logs.
Services:
dcos-log-master.service
dcos-log-master.socket
dcos-log-agent.service
dcos-log-agent.socket
Logrotate
manages rotation, compression, and deletion of historical log files.
Services:
dcos-logrotate-master.service
dcos-logrotate-master.timer
dcos-logrotate-agent.service
dcos-logrotate-agent.timer
DC/OS Metrics service
exposes node, container, and application metrics.
Services:
dcos-metrics-master.service
dcos-metrics-master.socket
dcos-metrics-agent.service
dcos-metrics-agent.socket
DC/OS Signal service
reports cluster telemetry and analytics to help improve DC/OS. Administrators can opt-out of telemetry at install time.
Services:
dcos-signal.service
dcos-signal.timer
DC/OS History service
caches and exposes historical system state to facilitate cluster usage statistics in the GUI.
Service:
dcos-history.service
Networking
Admin Router
exposes a unified control plane proxy for components and services using NGINX. Admin Router Agent proxies node-specific health, logs, metrics, and package management internal endpoints.
Services:
dcos-adminrouter.servicedcos-adminrouter-reload.servicedcos-adminrouter-reload.timerdcos-adminrouter-agent.servicedcos-adminrouter-agent-reload.servicedcos-adminrouter-agent-reload.timer
Mesos DNS
provides domain name based service discovery within the cluster.
Services:
dcos-mesos-dns.service
DNS Forwarder (Spartan)
forwards DNS requests to multiple DNS servers. Spartan Watchdog restarts Spartan when it is unhealthy.
Services:
dcos-spartan.servicedcos-spartan-watchdog.servicedcos-spartan-watchdog.timer
Generate resolv.conf
configures network name resolution by updating /etc/resolv.conf to facilitate DC/OS’s software defined networking.
Services:
dcos-gen-resolvconf.servicedcos-gen-resolvconf.timer
Minuteman
provides distributed Layer 4 virtual IP load balancing.
Services:
- Included in Navstar
Navstar
orchestrates virtual overlay networks using VXLAN.
Services:
dcos-navstar.service
Erlang Port Mapping Daemon (EPMD)
facilitates communication between distributed Erlang programs.
Services:
dcos-epmd.service
Package Management
DC/OS Package Manager (Cosmos)
installs and manages DC/OS packages from DC/OS package repositories, such as the Mesosphere Universe.
Services:
dcos-cosmos.service
DC/OS Component Package Manager (Pkgpanda) installs and manages DC/OS components.
Services:
dcos-pkgpanda-api.servicedcos-pkgpanda-api.socket
03 Hands on: SSH into our cluster
- PuTTY SSH client or equivalent (These instructions assume you are using PuTTY, but almost any SSH client will work.)
- PuTTYgen RSA and DSA key generation utility
- Pageant SSH authentication agent
To install these programs, download the Windows installer from the official PuTTY download page.
-
An unencrypted SSH key that can be used to authenticate with the cluster nodes over SSH. Encrypted SSH keys are not supported.
-
To authenticate the client the following 4-step message cycle is executed:
-
Client First Message: The client sends the username and a randomly generated number (this is typically done by a cryptographic random generator available with most browsers and other clients). This random number is sometimes called nonce
-
Server First Message: In response to a valid client first message, the server generates a nonce and appends the client’s nonce to it, then it sends a message that contains {the modified nonce, the salt, an iteration count} to the client.
-
Client Final Message: The client processes the server message and if everything is okay, it sends the client final message. This message contains a ‘proof’ that is computed using the password. This ‘proof’ is specific to the session.
-
Server Final Message: If the client is correctly authenticated, the server sends this message which contains the server’s ‘proof’ - the client can authenticate the identity of the server with this proof.
-
Two way communication is now established.
Convert the .pem file type to .ppk by using PuTTYgen:
-
Open PuTTYgen, select File > Load Private Key, and choose your
.pemfile. -
Select SSH-2 RSA as the key type, click Save private key, then choose the name and location to save your new .ppk key.
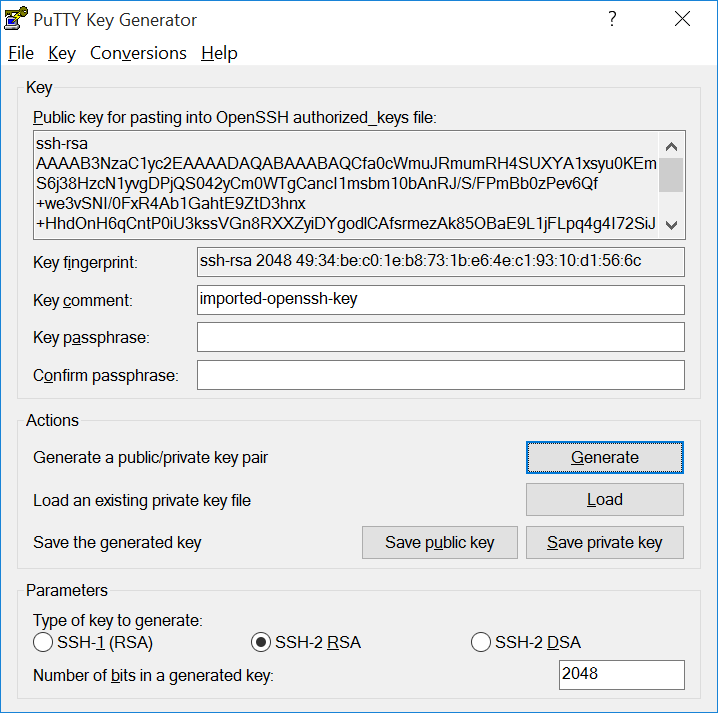
-
Close PuTTYgen.
-
SSH into the cluster.
-
To SSH to a master node:
-
From the DC/OS web interface, copy the IP address of the master node. It will be the IP address that you used to connect to the GUI.
-
Open PuTTY and enter the master node IP address in the Host Name (or IP address) field.

-
In the Category pane on the left side of the PuTTY window, choose Connection > SSH > Auth, click Browse, locate and select your
.ppkfile, then click Open.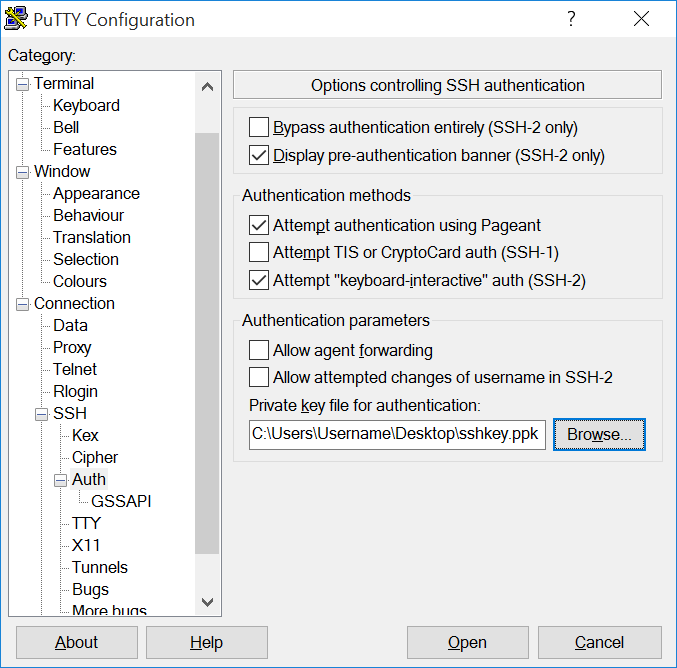
-
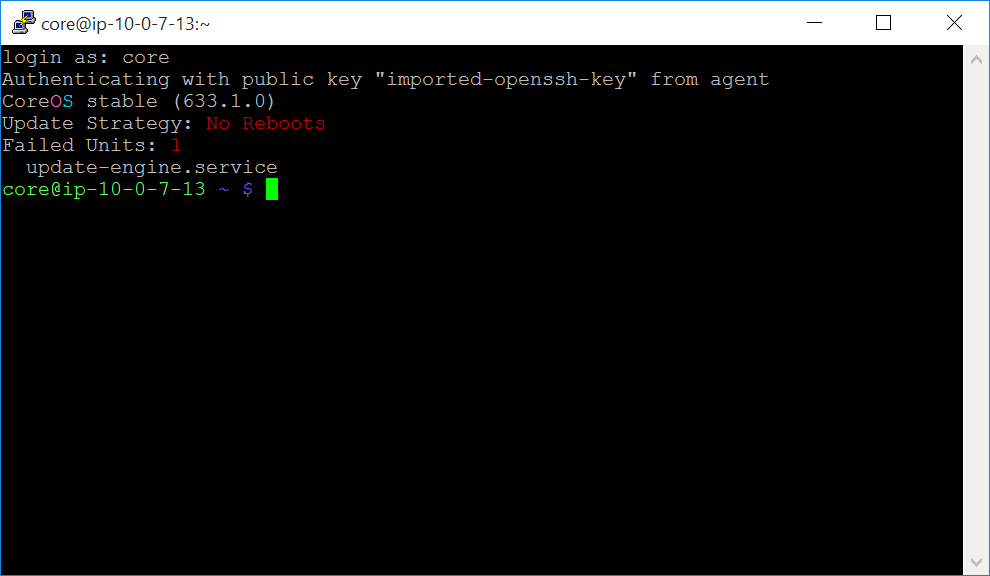
Login as user “core” if you’re running CoreOS. The default user on CentOS is “centos”.
-
-
To SSH to an agent node
Prerequisite: You must be logged out of your master node.
-
Enable agent forwarding in PuTTY.
Caution: SSH agent forwarding has security implications. Only add servers that you trust and that you intend to use with agent forwarding. For more information on agent forwarding. Ref: Using SSH agent forwarding.
-
Open PuTTY. In the Category pane on the left side of the PuTTY window, choose Connection > SSH > Auth and check the Allow agent forwarding box.
-
Click the Browse button and locate the
.ppkfile that you created previously using PuTTYgen.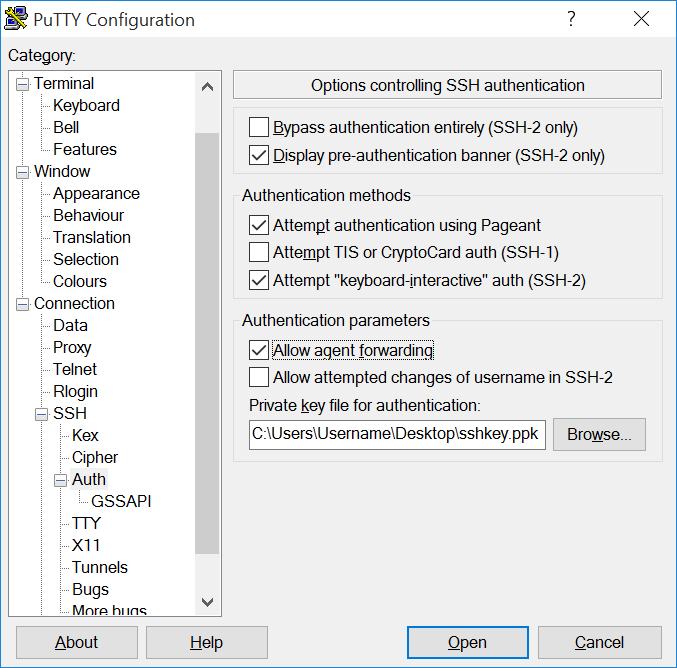
-
-
Add the
.ppkfile to Pageant.-
Open Pageant. If the Pageant window does not appear, look for the Pageant icon in the notification area in the lower right area of the screen next to the clock and double-click it to open Pageant’s main window.
-
Click the Add Key button.
-
Locate the
.ppkfile that you created using PuTTYgen and click Open to add your key to Pageant.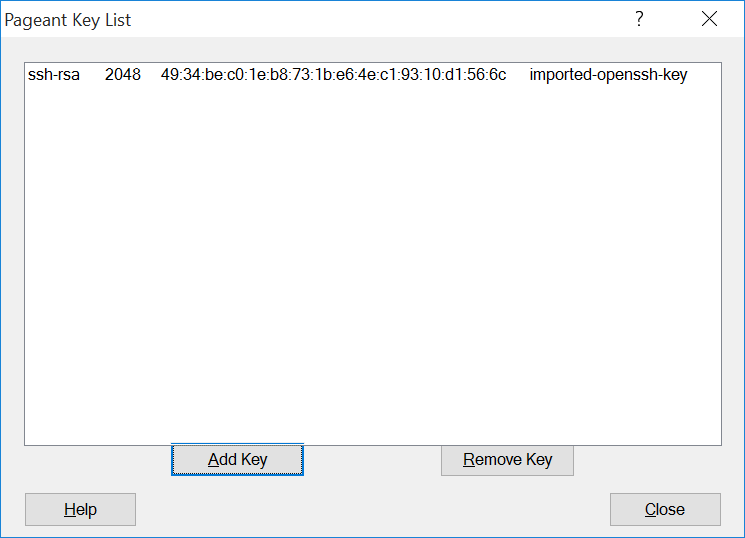
-
Click the Close button to close the Pageant window.
-
-
SSH into the master node.
-
From the DC/OS web interface, copy the IP address of the master node. The IP address is displayed beneath your cluster name.
-
In the Category pane on the left side of the PuTTY window, choose Session and enter the master node IP address in the Host Name (or IP address) field.
-
Login as user “core” if you’re running CoreOS. The default user on CentOS is “centos”.
-
-
From the master node, SSH into the agent node.
-
From the Mesos web interface, copy the agent node hostname. You can find hostnames on the Frameworks (
<master-node-IPaddress>/mesos/#/frameworks) or Slaves page (<master-node-IPaddress>/mesos/#/slaves). -
SSH into the agent node as the user
corewith the agent node hostname specified:ssh core@<agent-node-hostname>
-
-
-
04 Hands on: Service Discovery and Load Balancing
Vagrant up your cluster please. :)
Service Discovery is the process of finding out the IP:PORT combination a service is available from in a cluster of machines. Mesos Master is the ultimate source of truth concerning this information and as such any Service Discovery (SD) mechanisms need to consult it to learn about the mapping of a Mesos task (== service instance) to IP and port.
Let’s deploy a simple service using a named Virtual IP (VIP), then we will then scale it and observe the automagic load-balancing and last but not least we will make the service publicly accessible.
Setup
The simple service we will be using is written in Python and exposes only one endpoint, /endpoint0.
This endpoint responds with something like:
    {
        "host": "localhost:9876",
        "result": "all is well",
        "version": "0.3.0"
    }
Via the host field you can see from which machine the request came and the version field states the version of the service itself. Naturally, this is only a dummy service that does nothing useful, but it exposes the basic features needed for the following steps.
Invoking the service within the cluster via a named VIP
The containerized version of the simple service is a Docker image available via mhausenblas/simpleservice. This can be launched as a DC/OS service using the following specification:
    {
      "id": "/sise",
      "instances": 1,
      "cpus": 0.1,
      "mem": 32,
      "container": {
        "type": "DOCKER",
        "docker": {
          "image": "mhausenblas/simpleservice:0.3.0",
          "network": "HOST",
          "forcePullImage": true
        }
      },
      "portDefinitions": [
        {
          "labels": {
            "VIP_0": "/sise:80"
          }
        }
      ]
    }
Let’s assume you’ve saved above specification in a file called example-service.json, then you can launch the service using the DC/OS CLI:
$ dcos marathon app add example-service.json
From within the cluster, (SSH into a master node), the simple service can be invoked like so:
    core@ip-10-0-5-223 ~ $ curl sise.marathon.l4lb.thisdcos.directory:80/endpoint0
    {"host": "sise.marathon.l4lb.thisdcos.directory", "version": "0.3.0", "result": "all is well"}
To maintain uniqueness, the following URL pattern is used:
<vip-name>.<scheduler>.l4lb.thisdcos.directory:<vip-port>
Also, no matter on which host and port the service actually runs, you can invoke it from anywhere within the cluster using sise.marathon.l4lb.thisdcos.directory:80.
To make the service listen to the random port assigned by DC/OS, I’m passing in the special environment variable PORT0, which DC/OS automagically makes available in the task environment, to the service.
You can now see the result of the simple service being invoked from the DC/OS CLI:
    $ dcos task log --follow sise stderr
    I0923 14:12:46.683511 22454 exec.cpp:161] Version: 1.0.1
    I0923 14:12:46.687604 22463 exec.cpp:236] Executor registered on agent a9d74521-cf9f-479a-8b6e-f10ae1b82346-S0
    I0923 14:12:46.688691 22459 docker.cpp:815] Running docker -H unix:///var/run/docker.sock run --cpu-shares 102 --memory 33554432 -e MARATHON_APP_VERSION=2016-09-23T14:12:42.351Z -e HOST=10.0.0.114 -e MARATHON_APP_RESOURCE_CPUS=0.1 -e MARATHON_APP_RESOURCE_GPUS=0 -e MARATHON_APP_DOCKER_IMAGE=mhausenblas/simpleservice:0.3.0 -e PORT_10000=31747 -e MESOS_TASK_ID=sise.cac98ccf-8197-11e6-8b52-26ceb6df775b -e PORT=31747 -e MARATHON_APP_RESOURCE_MEM=32.0 -e PORTS=31747 -e MARATHON_APP_RESOURCE_DISK=0.0 -e MARATHON_APP_LABELS= -e MARATHON_APP_ID=/sise -e PORT0=31747 -e LIBPROCESS_IP=10.0.0.114 -e MESOS_SANDBOX=/mnt/mesos/sandbox -e MESOS_CONTAINER_NAME=mesos-a9d74521-cf9f-479a-8b6e-f10ae1b82346-S0.f19b3376-e999-41cd-9f00-12b9f7a01ae9 -v /var/lib/mesos/slave/slaves/a9d74521-cf9f-479a-8b6e-f10ae1b82346-S0/frameworks/a9d74521-cf9f-479a-8b6e-f10ae1b82346-0000/executors/sise.cac98ccf-8197-11e6-8b52-26ceb6df775b/runs/f19b3376-e999-41cd-9f00-12b9f7a01ae9:/mnt/mesos/sandbox --net host --name mesos-a9d74521-cf9f-479a-8b6e-f10ae1b82346-S0.f19b3376-e999-41cd-9f00-12b9f7a01ae9 mhausenblas/simpleservice:0.3.0
    2016-09-23T02:14:43 INFO /endpoint0 has been invoked from 10.0.5.223 [at line 35]
    2016-09-23T02:14:43 INFO 200 GET /endpoint0 (10.0.5.223) 1.08ms [at line 1946]
    2016-09-23T02:15:00 INFO /endpoint0 has been invoked from 10.0.5.223 [at line 35]
    2016-09-23T02:15:00 INFO 200 GET /endpoint0 (10.0.5.223) 0.66ms [at line 1946]
Scaling the service
So far we had one instance of the simple service running. Next, we assume we want to serve more load and hence scale the simple service up to 3 instances.
When we now look at the logs again we see the automatic load balancing between the three tasks (these are dummy hashes, your task IDs may differ) - sise.[5ca09a40-8198-11e6-8b52-26ceb6df775b], sise.5ca0c151-8198-11e6-8b52-26ceb6df775b, and sise.cac98ccf-8197-11e6-8b52-26ceb6df775b taking place:
    $ dcos task log --follow sise stderr
    ===> task:sise.5ca09a40-8198-11e6-8b52-26ceb6df775b:stderr <===
    I0923 14:16:48.579545   448 exec.cpp:236] Executor registered on agent a9d74521-cf9f-479a-8b6e-f10ae1b82346-S2
    I0923 14:16:48.580734   447 docker.cpp:815] Running docker -H unix:///var/run/docker.sock run --cpu-shares 102 --memory 33554432 -e MARATHON_APP_VERSION=2016-09-23T14:16:47.027Z -e HOST=10.0.0.115 -e MARATHON_APP_RESOURCE_CPUS=0.1 -e MARATHON_APP_RESOURCE_GPUS=0 -e MARATHON_APP_DOCKER_IMAGE=mhausenblas/simpleservice:0.3.0 -e PORT_10000=29727 -e MESOS_TASK_ID=sise.5ca09a40-8198-11e6-8b52-26ceb6df775b -e PORT=29727 -e MARATHON_APP_RESOURCE_MEM=32.0 -e PORTS=29727 -e MARATHON_APP_RESOURCE_DISK=0.0 -e MARATHON_APP_LABELS= -e MARATHON_APP_ID=/sise -e PORT0=29727 -e LIBPROCESS_IP=10.0.0.115 -e MESOS_SANDBOX=/mnt/mesos/sandbox -e MESOS_CONTAINER_NAME=mesos-a9d74521-cf9f-479a-8b6e-f10ae1b82346-S2.07e049b6-201c-47dc-9228-fad4048e387d -v /var/lib/mesos/slave/slaves/a9d74521-cf9f-479a-8b6e-f10ae1b82346-S2/frameworks/a9d74521-cf9f-479a-8b6e-f10ae1b82346-0000/executors/sise.5ca09a40-8198-11e6-8b52-26ceb6df775b/runs/07e049b6-201c-47dc-9228-fad4048e387d:/mnt/mesos/sandbox --net host --name mesos-a9d74521-cf9f-479a-8b6e-f10ae1b82346-S2.07e049b6-201c-47dc-9228-fad4048e387d mhausenblas/simpleservice:0.3.0
    2016-09-23T02:17:48 INFO /endpoint0 has been invoked from 10.0.5.223 [at line 35]
    2016-09-23T02:17:48 INFO 200 GET /endpoint0 (10.0.5.223) 1.12ms [at line 1946]
    2016-09-23T02:19:18 INFO /endpoint0 has been invoked from 10.0.5.223 [at line 35]
    2016-09-23T02:19:18 INFO 200 GET /endpoint0 (10.0.5.223) 0.61ms [at line 1946]
    2016-09-23T02:19:20 INFO /endpoint0 has been invoked from 10.0.5.223 [at line 35]
    2016-09-23T02:19:20 INFO 200 GET /endpoint0 (10.0.5.223) 0.56ms [at line 1946]
    2016-09-23T02:25:07 INFO /endpoint0 has been invoked from 10.0.5.223 [at line 35]
    2016-09-23T02:25:07 INFO 200 GET /endpoint0 (10.0.5.223) 0.65ms [at line 1946]
    ===> task:sise.5ca0c151-8198-11e6-8b52-26ceb6df775b:stderr <===
    2016-09-23T02:19:22 INFO /endpoint0 has been invoked from 10.0.5.223 [at line 35]
    2016-09-23T02:19:22 INFO 200 GET /endpoint0 (10.0.5.223) 0.87ms [at line 1946]
    2016-09-23T02:24:56 INFO /endpoint0 has been invoked from 10.0.5.223 [at line 35]
    2016-09-23T02:24:56 INFO 200 GET /endpoint0 (10.0.5.223) 0.67ms [at line 1946]
    2016-09-23T02:25:00 INFO /endpoint0 has been invoked from 10.0.5.223 [at line 35]
    2016-09-23T02:25:00 INFO 200 GET /endpoint0 (10.0.5.223) 0.65ms [at line 1946]
    2016-09-23T02:25:01 INFO /endpoint0 has been invoked from 10.0.5.223 [at line 35]
    2016-09-23T02:25:01 INFO 200 GET /endpoint0 (10.0.5.223) 0.68ms [at line 1946]
    2016-09-23T02:25:06 INFO /endpoint0 has been invoked from 10.0.5.223 [at line 35]
    2016-09-23T02:25:06 INFO 200 GET /endpoint0 (10.0.5.223) 0.65ms [at line 1946]
    ===> task:sise.cac98ccf-8197-11e6-8b52-26ceb6df775b:stderr <===
    2016-09-23T02:19:17 INFO /endpoint0 has been invoked from 10.0.5.223 [at line 35]
    2016-09-23T02:19:17 INFO 200 GET /endpoint0 (10.0.5.223) 0.59ms [at line 1946]
    2016-09-23T02:25:02 INFO /endpoint0 has been invoked from 10.0.5.223 [at line 35]
    2016-09-23T02:25:02 INFO 200 GET /endpoint0 (10.0.5.223) 0.60ms [at line 1946]
    2016-09-23T02:25:03 INFO /endpoint0 has been invoked from 10.0.5.223 [at line 35]
    2016-09-23T02:25:03 INFO 200 GET /endpoint0 (10.0.5.223) 0.63ms [at line 1946]
    2016-09-23T02:25:05 INFO /endpoint0 has been invoked from 10.0.5.223 [at line 35]
    2016-09-23T02:25:05 INFO 200 GET /endpoint0 (10.0.5.223) 0.58ms [at line 1946]
    2016-09-23T02:25:30 INFO /endpoint0 has been invoked from 10.0.5.223 [at line 35]
    2016-09-23T02:25:30 INFO 200 GET /endpoint0 (10.0.5.223) 0.59ms [at line 1946]
    ===> task:sise.5ca09a40-8198-11e6-8b52-26ceb6df775b:stderr <===
    2016-09-23T02:25:33 INFO /endpoint0 has been invoked from 10.0.5.223 [at line 35]
    2016-09-23T02:25:33 INFO 200 GET /endpoint0 (10.0.5.223) 0.63ms [at line 1946]
    2016-09-23T02:25:35 INFO /endpoint0 has been invoked from 10.0.5.223 [at line 35]
    2016-09-23T02:25:35 INFO 200 GET /endpoint0 (10.0.5.223) 0.62ms [at line 1946]
    ===> task:sise.5ca0c151-8198-11e6-8b52-26ceb6df775b:stderr <===
    2016-09-23T02:25:38 INFO /endpoint0 has been invoked from 10.0.5.223 [at line 35]
    2016-09-23T02:25:38 INFO 200 GET /endpoint0 (10.0.5.223) 0.86ms [at line 1946]
Exposing the service to the Web using Marathon-LB
So far we were able to access the simple service from within the cluster, for example, from another service or manually as we did above using curl. Now we want to make the service available to the public.
To expose the simple service to the Web, we use Marathon-LB.
If needed, install marathon-lb from the GUI or CLI:
$ dcos package install marathon-lb
To expose the simple service you only need to add two labels, HAPROXY_GROUP and HAPROXY_0_VHOST (set it to the public agent host) and define a port, 10010 in our case:
    {
      "id": "/sise",
      "instances": 3,
      "cpus": 0.1,
      "mem": 32,
      "container": {
        "type": "DOCKER",
        "docker": {
          "image": "mhausenblas/simpleservice:0.3.0",
          "network": "HOST",
          "forcePullImage": true
        }
      },
      "labels": {
        "HAPROXY_GROUP": "external",
        "HAPROXY_0_VHOST": "http://ec2-52-42-2-149.us-west-2.compute.amazonaws.com"
      },
      "portDefinitions": [{
        "port": 10010,
        "labels": {
          "VIP_0": "/sise:80"
        }
      }]
    }
Now we can deploy the simple service again:
$ dcos marathon app add example-service-external.json
And list all of the tasks that currently run (we expect MLB and three instances of our simple service):
    $ dcos task
    NAME         HOST        USER  STATE  ID
    marathon-lb  10.0.4.224  root    R    marathon-lb.dd8c87c5-819a-11e6-8b52-26ceb6df775b
    sise         10.0.0.114  root    R    sise.1417e3b9-819c-11e6-8b52-26ceb6df775b
    sise         10.0.0.114  root    R    sise.d45af1db-819c-11e6-8b52-26ceb6df775b
    sise         10.0.0.115  root    R    sise.d45acaca-819c-11e6-8b52-26ceb6df775b
Now, MLB uses HAProxy on a public node to expose services to the public.
As a result of using MBL we can now invoke our simple service from anywhere on the Internet:
    $ http http://ec2-52-42-2-149.us-west-2.compute.amazonaws.com:10010/endpoint0
    HTTP/1.1 200 OK
    Content-Length: 110
    Content-Type: application/json
    Date: Fri, 23 Sep 2016 14:46:54 GMT
    Etag: "d9ba10b4a90ac72d4578dab377b010ccfaaaaef5"
    Server: TornadoServer/4.3

    {
        "host": "ec2-52-42-2-149.us-west-2.compute.amazonaws.com:10010",
        "result": "all is well",
        "version": "0.3.0"
    }
Summing up, we exposed and invoked a simple service using VIPs and MLB with a few configuration settings necessary and most of the heavy lifting taking care of by DC/OS.
05 Hands on: Installation revisited
vagrant destroy -f everything before moving on.
Create a new folder (leave your ealier cluster alone for this one)
We’ll follow the basic steps again, just to kickstart things:
* Install the vagrant hostmanager plugin:

```shell
vagrant plugin install vagrant-hostmanager
```

* now clone the git repo into your folder:

```shell
git clone https://github.com/dcos/dcos-vagrant
```

* move into the new directory

```shell
cd dcos-vagrant
```
This installation method uses a bootstrap node to administer the DC/OS installation across your cluster. The bootstrap node uses an SSH key to connect to each node in your cluster to automate the DC/OS installation.
- Upgrades are not supported with this installation method.
The DC/OS installation creates these folders:
| Folder | Description |
|---|---|
/opt/mesosphere |
Contains all the DC/OS binaries, libraries, cluster configuration. Do not modify. |
/etc/systemd/system/dcos.target.wants |
Contains the systemd services which start the things that make up systemd. They must live outside of `/opt/mesosphere` because of systemd constraints. |
/etc/systemd/system/dcos.<units> |
Contains copies of the units in `/etc/systemd/system/dcos.target.wants`. They must be at the top folder as well as inside `dcos.target.wants`. |
/var/lib/dcos/exhibitor/zookeeper |
Contains the ZooKeeper data. |
/var/lib/docker |
Contains the Docker data. |
/var/lib/dcos |
Contains the DC/OS data. |
/var/lib/mesos |
Contains the Mesos data. |
- Changes to
/opt/mesosphereare unsupported. They can lead to unpredictable behavior in DC/OS and prevent upgrades.
Install DC/OS
- Download the DC/OS installer to your bootstrap node.
curl -O https://downloads.dcos.io/dcos/stable/dcos_generate_config.sh
- From your terminal, start the DC/OS GUI installer with this command.
sudo bash dcos_generate_config.sh --web
Here is an example of the output.
Running mesosphere/dcos-genconf docker with BUILD_DIR set to /home/centos/genconf
16:36:09 dcos_installer.action_lib.prettyprint:: ====> Starting DC/OS installer in web mode
16:36:09 root:: Starting server ('0.0.0.0', 9000)
- You can add the verbose (
-v) flag to see the debug output:
sudo bash dcos_generate_config.sh --web -v
-
Launch the DC/OS web installer in your browser at:
http://<bootstrap-node-public-ip>:9000. -
Click Begin Installation.
-
Specify your Deployment and DC/OS Environment settings:
Deployment Settings
Master Private IP List
Specify a comma-separated list of your internal static master IP addresses.
Agent Private IP List
Specify a comma-separated list of your internal static private agent private IP addresses.
Agent Public IP List
Specify a comma-separated list of your internal static public agent private IP addresses.
Master Public IP
Specify a publicly accessible proxy IP address to one of your master nodes. If you don’t have a proxy or already have access to the network where you are deploying this cluster, you can use one of the master IP’s that you specified in the master list. This proxy IP address is used to access the DC/OS web interface on the master node after DC/OS is installed.
SSH Username
Specify the SSH username, for example
centos.SSH Listening Port
Specify the port to SSH to, for example
22.Private SSH Key
Specify the private SSH key with access to your master IPs.
DC/OS Environment Settings
Upstream DNS Servers
Specify a comma-separated list of DNS resolvers for your DC/OS cluster nodes. Set this parameter to the most authoritative nameservers that you have. If you want to resolve internal hostnames, set it to a nameserver that can resolve them. If you have no internal hostnames to resolve, you can set this to a public nameserver like Google or AWS.
In the example above, the Google Public DNS IP addresses (IPv4) are specified:
8.8.8.8and8.8.4.4. If Google DNS is not available in your country, you can replace the Google DNS servers with your local DNS servers.** Caution: If you set this parameter incorrectly you will have to reinstall DC/OS.**
IP Detect Script
Choose an IP detect script from the dropdown to broadcast the IP address of each node across the cluster. Each node in a DC/OS cluster has a unique IP address that is used to communicate between nodes in the cluster. The IP detect script prints the unique IPv4 address of a node to STDOUT each time DC/OS is started on the node.
Important: The IP address of a node must not change after DC/OS is installed on the node. For example, the IP address must not change when a node is rebooted or if the DHCP lease is renewed. **If the IP address of a node does change, the node must be wiped and reinstalled. **
Send Anonymous Telemetry
Indicate whether to allow Mesosphere to collect anonymous DC/OS usage data.
Enable Authentication
Indicate whether to enable authentication for your DC/OS cluster.
-
Click Run Pre-Flight. The preflight script installs the cluster prerequisites and validates that your cluster is installable. This step can take up to 15 minutes to complete. If errors any errors are found, fix and then click Retry.
*Important: If you exit your GUI installation before launching DC/OS, you must do this before reinstalling:
*   SSH to each node in your cluster and run `rm -rf /opt/mesosphere`.
*   SSH to your bootstrap master node and run `rm -rf /var/lib/dcos/exhibitor/zookeeper`
-
Click Deploy to install DC/OS on your cluster. If errors any errors are found, fix and then click Retry.
This step might take a few minutes, depending on the size of your cluster.
-
Click Run Post-Flight. If errors any errors are found, fix and then click Retry.
Notes:
- If you encounter errors such as
Time is marked as bad,adjtimex, orTime not in syncduring Post-Flight, verify that Network Time Protocol (NTP) is enabled on all nodes. - You can click Download Logs to view your logs locally.
- If this takes longer than about 10 minutes, you’ve probably misconfigured your cluste.
- If you encounter errors such as
-
Click Log In To DC/OS.
You are done!
Whoa! we are done!
This was fun for me. Thank you for being so nice to me.
DC/OS and Distributed computing is an growing, involved field. Here’s wishing you happy discovering.
You can find more cool things to read and refer to here: https://github.com/theanalyst/awesome-distributed-systems
au revoir!
noun au re·voir \ˌōr-ə-ˈvwär, ˌȯr-, French ōr(-ə)-vw’r
Till we meet again.